

How To Attract Zombies In Minecraft
Drowned farming is a manner to harvest experience orbs and loot dropped by both zombie and drowned mobs. In addition to explaining general mechanics of drowned farming, this tutorial describes two basic drowned farms that are easy to construct in survival mode, without needing a villager every bit bait.
In all editions, the simple flooded-dungeon farm described start produces rotten mankind, fe, gold and chainmail armor, and weapons dropped by zombies, as well as experience orbs and copper ingots dropped by drowned, but not nautilus shells or tridents. In Boulder Edition this farm also produces nautilus shells, merely not tridents.
The aerial farm (described 2nd) produces simply drowned drops including tridents, but not zombie drops. While the aerial farm doesn't require exotic materials, information technology does require large amounts of materials and is more fourth dimension-consuming to build.
More circuitous farms are possible, particularly underwater farms for naturally-spawned drowned, which also yield tridents and nautilus shells. The simple survival-way flooded-dungeon subcontract described here is however useful for gaining a quick and easy way to harvest experience and zombie drops without requiring significant construction or materials.
Mechanics [ ]
In that location are three main ways to subcontract drowned, depending on the Edition and which drops you desire most. In most cases, information technology'due south a good idea to impale the drowned manually to obtain the more than valuable boodle.
Flooded dungeon [ ]
The detailed instructions in this tutorial explicate how to apply a flooded dungeon that converts zombies to drowned. This is the easiest method to implement in survival mode.
In Coffee Edition, this subcontract produces the usual zombie drops besides every bit experience (XP), but it doesn't produce the tridents and nautilus shells specific to drowned. In Bedrock Edition, this farm does produce nautilus shells but non tridents (zombies converted to drowned no longer drop tridents as of Bedrock Edition 1.sixteen.0).
A flooded dungeon works past spawning zombies from the monster spawner in the dungeon. The zombies are funneled into an underwater chamber where they drown. Once converted to drowned, the player can manually kill them for their boodle and experience.
The reward to the flooded dungeon subcontract is that information technology produces potentially valuable zombie drops, such as iron swords and shovels, chainmail armor, and gold armor — any of which may take valuable enchantments. The disadvantage is that it does not produce tridents in any edition, and does non produce nautilus shells in Coffee Edition. However, information technology does produce copper ingots in both editions, as well as nautilus shells in Bedrock Edition.
Aerial [ ]
An aerial subcontract is probably the almost practical way to farm tridents. It works by spawning drowned naturally on an aeriform platform at to the lowest degree 24 blocks higher up the player, with the player being beyond the maximum spawning range of whatsoever other spawnable surface in the world. The drowned spawn naturally under the correct weather of existence underwater at light level nothing, and they are funneled first into an intermediate area to prevent lethal fall damage, before dropping into the killing chamber where the role player waits. The subcontract described hither takes reward of a mechanic in Bedrock Edition whereby a unmarried layer of water causes an increasing reduction of light level with depth below that layer; the drowned spawn on a moisture platform some altitude under a glass-bottomed pool of h2o. In Java Edition, ii layers of h2o may be needed for the platform to spawn drowned.
The disadvantage to the aerial farm is that it produces just drowned drops, but not zombie drops. As such, it is a practiced source of nautilus shells, tridents, and copper ingots, but non the valuable zombie drops such as enchanted items and armor made from atomic number 26 or gold.
Underwater [ ]
An underwater farm is another way to subcontract tridents. Drowned farms in a body of water are more complicated considering they function similar to a dry-land mob subcontract.
In an underwater subcontract, naturally-spawned drowned are attracted to a location and funneled into one expanse where the player can impale them. A villager is typically used as bait to attract drowned, and the funneling can be accomplished with bubble columns. Transporting a villager to an undersea room in survival mode is a complex undertaking that requires much forethought, preparation, implementation time, and adventure.
Instead of a villager, a turtle egg might also work as bait, although this is less reliable because drowned don't find eggs as they practice villagers; they must first happen to look in the egg's direction, and then have a articulate path to the egg, and the egg must take sufficient space higher up to let trampling on it.
Like an aerial farm, an underwater farm does not produce zombie drops, but drowned drops.
Survival-mode build: Flooded dungeon [ ]
Location [ ]
The simplest way to start a survival-style drowned and zombie farm is to locate a dungeon room that contains a zombie mob spawner. Ideally the room should exist reasonably close to the overworld surface, simply can be any depth that allows for excavation 5 blocks or and so underneath the floor. Sometimes a dungeon is found a short distance within a cave entrance. Dissimilar an XP farm that generally requires a long falling altitude from the dungeon to bring the mobs to about decease, no deep excavation is required for a drowned subcontract.
Preparation [ ]
To construct a survival-mode drowned farm, y'all need a conveniently located dungeon with a zombie monster spawner, equally well as a adept weapon to clear out the dungeon, a cheap weapon to harvest drowned, torches, pickaxes, a h2o bucket, and a few signs. Optionally, glass blocks are helpful for viewing when a zombie becomes drowned. Hoppers and a couple of chests also aid collection but are not necessary.
For convenience, it is overnice to accept nearby (outside the dungeon room), a source of h2o to scoop with the bucket, gates or doors to keep mobs from wandering into your cave while you work, and a home base or temporary base with your bed, crafting table, and other helpful items a brusk walk away.
Construction [ ]
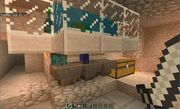
Side view of a drowned farm. It tin exist made with a single hopper only works better with more than, so the mobs spread out for easier targeting. The lower-level water is surrounded by drinking glass blocks with slabs fastened to the bottoms to prevent babe zombies from escaping. Signs are visible behind the slabs, belongings up the water. The pigsty side by side to the chest allows for easy disposal of unwanted items, which despawn a few minutes later being thrown into the hole.
The analogy on the right shows a side view of a basic survival-mode drowned farm, showing the dungeon above and the trap / collection room beneath.
Ready the dungeon [ ]
Upon locating a dungeon and breaking into it:
- Speedily identify a torch on the mob spawner block to prevent it from spawning farther zombies.
- Use your good weapon to kill any remaining zombies in the room.
- Close off any holes in the walls other than the entrance manner you intend to utilize to arrive and out of the room.
- Ransack and collect the chests for later use.
- It is not necessary to dig out the floor around the mob spawner, just doing so lets the spawner use its full vertical spawning book. Excavation out ii layers allows mobs that spawn upstream of the spawner to be exist swept underneath without getting stuck. You may besides optionally expand the room to four blocks horizontally from the monster spawner block (a 9×9 room). The room still produces more than enough zombies without these expansions, however.
Take note of the coordinate location of the eye block along the wall with your opening. This floor block is in line with the mob spawner. In the final pace, y'all flood the dungeon with water and dig a hole in this location for the mobs to fall through.
After preparation, exit through your opening. Don't shut it off yet.
Set up the trap [ ]
Side by side, underneath the dungeon, excavate the trap room. The room should be large enough to motility around in, and contain the trap described beneath.
At the nigh bones level, the trap consists of a unmarried water block that the zombie falls through from above, landing on a block (or a hopper) so the zombie's caput remains in the h2o and drowns it. A sign on the wall holds up the bottom of the water block, and solid blocks enclose the water on all sides. The enclosing blocks may be glass to aid your identification of drowned zombies versus non-drowned zombies.
With a i-water-block trap, zombies but crowd into that one-block space, making it hard to target the drowned zombies with your weapon. Permit the zombies to spread out every bit they drown by extending the trap to multiple blocks. In practise, a trap using a two-cake water aqueduct held upward with two signs, with two landing blocks (or hoppers) below the channel, works sufficiently well. The illustration shows a design using a three-block h2o channel, three signs, and 3 hoppers.
- Place blocks (preferably glass) on the ceiling to incorporate the water channel. One long side of the aqueduct can exist bounded by the wall of your room. The channel should be directly below the floor block previously measured in the dungeon above. This is where the water falls through into the channel.
- Place signs forth the wall. The signs concord up the bottom of the h2o blocks while providing air space for you and mobs to pass by the signs.
- Using a water saucepan, place a block of water on each cease of the channel. If your channel is 3 blocks long, you need only two water blocks; the center cake fills itself in. The aqueduct must be completely full of all the same water. Running water allows for some breathing space; y'all want to avoid that.
- Only after filling the aqueduct with water, place the hoppers nether each sign, pointing toward the chest at the end of the line. Exist outside the channel earlier yous install the hoppers, lest you lot end up drowning yourself.
- Hoppers are needed only to collect drops and motion them into the chest.
- If you tin't afford hoppers (due to the amount of atomic number 26 required), y'all can use stone blocks. In this instance, merely dig a 1-cake trench next to these stone blocks and then that you can fit underneath the overhead slabs, to get shut enough to the dropped items to collect them yourself.
- Identify slabs underneath the glass to create a half-block high infinite, enough for you lot to swing a sword at the drowned's legs, just non enough for baby zombies to slip through.
Outset the subcontract [ ]
Finally, get back into the dungeon in a higher place.
- Identify ii water blocks, one at each corner opposite your entrance opening. The h2o should completely make full the room, sweeping you toward the entrance. If y'all have expanded the room and the water doesn't comprehend the whole floor, you may demand an additional water block on each side wall, or build a rock structure in the far corners for the water to cascade down and spread more than. If you stand up anywhere in the room, the h2o should button you lot toward the eye of the wall at your entrance pigsty.
- Stand on the threshold of your entrance, out of the water, to avoid drowning yourself in this footstep. Dig out the floor block at the eye of the wall, causing the water to spill down into the channel in the collection room below. The reason to dig this pigsty after flooding the dungeon is considering placing a water block near a hole causes the flow direction rules to forestall the h2o from covering the entire room.
- Break the torch on the mob spawner. A zombie spawns the instant the torch breaks. Apace seal the opening of the dungeon. You tin can seal it with glass blocks as shown in the illustration, to let you lot run into into the dungeon. You can recover the torch from the chest below.
- If no zombies spawn, the lite level in the spawning room may be too bright. Adjust your arrangement of torches exterior the room accordingly.
Operation [ ]
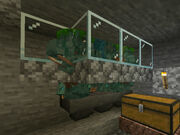
Operational drowned farm as described higher up, showing a drowned and a zombie not yet drowned. The recessed area in the floor with stone slabs gives the player a better vantage point for whacking at the legs.
Get downwards into your collection room. Equally zombies fall into the water-trap channel, they wander dorsum and forth beyond the tops of the hoppers with their heads in the water channel. After thirty seconds of having its head submerged, a zombie starts to drown, quivering visibly for 15 seconds, and and then changes color. Its pants turn from blue to greenish. Its eyes, visible through the glass blocks, too change to a blue glow.
The legs of the mobs are exposed to you. With your cheap weapon, or even bare easily, whack at the legs of a drowned. Four hits with a stone sword can kill information technology. Experience orbs float toward you lot, and the drowned's possessions drib into the hoppers and end up in the chest (or if you didn't utilise hoppers, the drops come to you if you get close enough). Eventually nautilus shells[ Bedrock Edition only ], equally well as copper ingots, armor (leather, gold, and chainmail, often enchanted) appear in the drove chest forth with rotten flesh and miscellaneous other items.
The chest fills chop-chop considering weapons and armor each occupy their own inventory slots. Y'all may find information technology useful to have a garbage disposal pigsty in the ground somewhere in the room in which to throw unwanted items, which despawn later on a few minutes in the hole. You can combine unenchanted armor and weapons in a grindstone to repair them, thereby saving space in your chest.
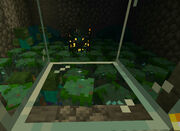
Spawning room total of monsters, with drowning platform below built to bypass the mob cap.
Killing platform with dozens of drowned and zombies due bypassing the mob cap. This becomes a good source of gold or fe from zombies, and copper from drowned.
Baby zombies occasionally spawn, but they don't drown because they're too brusk. Merely kill these when they appear. The slabs under the drinking glass blocks prevent them from escaping, and also prevent them from attacking you (although they tin nonetheless hit downward if you get too close). Zombie villagers also spawn occasionally, and can be killed immediately considering they don't drown.
To featherbed the mob cap, make sure that part of the drowning platform is outside the nine×9×9 volume (in Coffee Edition) or the 16×ten×16 volume (in Boulder Edition) centered on the lower northwest corner of the spawner. This is hands achieved by expanding the dungeon to 9×nine, lowering the floor two blocks beneath the spawner, and building the killing platform and then that it extends away from the spawner. When a zombie or drowned wanders outside that book, it is no longer counted in the mob cap and the spawner keeps producing more zombies. This way it is possible to take over 100 zombies and drowned crowded into your farm.
Iron, gold, and copper farming [ ]
If yous are in a situation where there isn't whatever style to build an iron golem farm for fe (say you are playing an island survival game and there is no village inside thousands of blocks), or a gold subcontract for gold, you feel like you lot've mined out your area, and you no longer need drops from drowned, y'all can apply a flooded dungeon subcontract to harvest iron and aureate from the zombies, and copper from drowned. It's a slow simply constructive way to get atomic number 26 and gold ingots. Gold ingots (mostly from golden armor smelted into nuggets) accumulate faster than iron ingots. The accumulation rate of copper ingots is in between gold and iron.
The flooded dungeon farm only needs some pocket-size modifications in your killing room:
- Add another large chest, to go on special enchanted items.
- Add together a crafting table.
- Add a furnace.
- If you haven't done so already, dig small pigsty in the floor to discard unwanted items (leather, rotten flesh, evidently gold items after you accept plenty golden, etc.)
Bring plenty of food, stock your furnace with fuel, craft a few stone swords, and do the post-obit:
- Switch to Hard difficulty to maximize the zombie drops of golden and iron items.
- Kill the zombies equally they enter the killing chamber. You can wait for them to drown only you don't accept to. The zombies however drib their items whether yous kill them or if they convert into drowned. Even so, if you encounter an armored zombie, let it drown, considering an armored zombie requires more hits to kill, and it drops the armor anyhow when it drowns.
- Periodically check the collection chest and remove any iron or golden items (and copper ingots from whatever drowned), and put them in your inventory.
- If you get a sword or iron shovel, use it as a weapon but don't use it until it breaks. This lets you avert crafting more swords to kill the zombies. Y'all're going to smelt it into a asset, so yous may as well get some use out of it first.
- An fe sword kills a zombie or drowned in iv hits. A shovel needs vii hits.
- Pay attention to the durability as you use these swords or shovels. When the immovability bar shows that the item is nearly depleted, put information technology in your inventory and move on to the adjacent weapon. Don't try to repair them. You need each worn-out iron weapon or tool to get an atomic number 26 nugget.
- When your inventory is full, use the furnace to smelt your iron or gold items (especially the worn-out ones you used as weapons) into nuggets.
- Apply the crafting table to craft the nuggets into ingots.
- Remove non-smeltable remaining items from your collection chest and throw them downwardly the hole.
- Echo.
You can collect gilded ingots rather speedily this style. Fe is much slower. With luck, you lot can collect plenty iron nuggets to brand nearly 5 ingots per 60 minutes. Information technology's a grind, but depending on your situation, this may exist a viable selection to obtain iron. As a bonus, you accrue a lot of experience while doing this.
Survival way build: Aerial platform [ ]
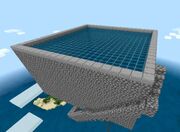
An aerial spawning platform offers a mode to farm naturally-spawned drowned, which can drop tridents when killed by the role player, in Java Edition and in Boulder Edition. Like the flooded dungeon above, the most bones survival-style aerial drowned farm doesn't require exotic materials, but information technology requires a large quantity of mutual materials such equally asphalt, h2o, and drinking glass. You'll also need some slabs, wooden buttons or signs to control water flow, as well as a hopper and a breast.
This farm relies on light attenuation by water to create sufficient darkness in a spawning room with flowing water to sweep the drowned into a killing area.
- The general-purpose spawning room works in both Java Edition and Boulder Edition, but Bedrock Edition has an interesting feature that allows for a simpler culling, in which ane layer of water attenuates light by 2 levels and provides further attenuation of ane light level per cake of distance beneath the water layer. Therefore, a single layer of water on a drinking glass roof attenuates total sunlight to cypher xiii blocks below the water. This farm was built and tested in Bedrock Edition using this feature as an alternative.
- Efficiency: The bespeak of this tutorial is to describe a basic survival-build farm that produces tridents and nautilus shells. Information technology tin be made more efficient by contriving to put a turtle egg or villager in the center of the spawning platform to draw the drowned to their death.
Components [ ]
The main components of an aeriform drowned farm are (from lowest to highest acme):
- in Bedrock Edition, a location, preferably in deep body of water, preferably at to the lowest degree 50 blocks away from land
- in Java Edition, a river biome (use the F3 screen to confirm y'all are in a river biome)
- A belfry to climb, from which to build structures at loftier altitudes
- A killing platform
- A drib shaft
- A drib platform; a small water platform some distance (similar 20 blocks) higher up the killing platform to funnel drowned to fall into the drop shaft and onto the killing platform
- A spawning platform at least 24 blocks higher up the killing platform
Grooming [ ]
Before starting, you demand to collect:
- Several full stacks of cobblestone
- If you can get a lava bucket, you lot tin make a cobblestone subcontract to get an endless supply
- You need cobblestone blocks non merely for building, just for making stone pickaxes to harvest asphalt from the farm, and to brand rock stairs for getting around the superlative of the subcontract, too equally stone slabs to prevent mobs from spawning on exposed horizontal surfaces
- 4 to 5 total stacks of glass blocks; this may exist the hardest material to collect without a desert nearby
- A couple stacks of ladders or scaffolding for climbing back up your farm if you fall during construction.
- A hopper (optional, merely makes collecting loot easier)
- A chest (preferably two for a double chest)
- A handful of buttons or signs to command water flow
- A stack of slabs
- Two h2o buckets
- At least 2 or three torches
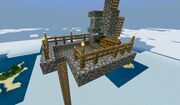
Building from the bottom up [ ]
This climbing belfry is built on summit of kelp. The construction on the left is a small cobblestone farm.
- Climbing belfry
The climbing belfry is your access to the killing platform in the sky. In survival mode, building over the sea offers rubber in falling, unlike building over country. If y'all fall, y'all just have the inconvenience of climbing support.
The most efficient way to start the tower over the bounding main is to row a gunkhole out to a deep spot with kelp growing almost the water surface, allowing you to build from the peak of the kelp without needing to build your tower all the way from the ocean floor, and without needing to swim. You can also put a lily pad on the water to offset building from. Or, with a chip more materials and fourth dimension, you can build a sea-level path from your land base out to your build location, and beginning building a belfry out of any textile, as loftier as yous demand. If you forget some materials, simply jump into the ocean and replenish. Yous can build a ladder up one side as you build the tower, or if yous have enough cloth and fourth dimension on your hands, your tower can be a staircase.
Example of killing platform, with a hopper and breast. The ladders are for aiding construction in survival manner.
- Killing platform
The first platform y'all build from this tower is the killing platform, and this is where y'all await for the drowned to autumn from above, and so the minimum altitude must be out of the spawning range to the ocean floor or nearby country.
In Bedrock Edition, mobs spawn in the range of 24-44 blocks from the player. In Java Edition, mobs spawn in the range of 24-128 blocks from the player. Building over deep ocean far from state allows for somewhat lower distance. The killing platform where y'all wait for the drowned must be more the maximum spawning range from whatsoever possible spawning location on land or in the sea.
The bones killing platform has:
- enough space for you to motility around
- a chest
- a landing cake onto which the drowned autumn; if this is a hopper, it feeds into the chest
- a half-block space between the top of the landing block and the bottom of the driblet shaft above it; the half-block of space lets you assail while preventing any baby drowned from escaping.
- ane or ii torches to keep the platform lit, to prevent mobs spawning on information technology while y'all're away
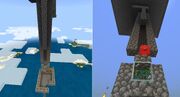
Two views of the driblet shaft, partially open to see drowned falling, although it works best completely airtight off.
- Driblet shaft
The drop shaft is a vertical tunnel through which mobs autumn onto the killing platform. The walls of the shaft demand not exist solid for the whole altitude, it'south enough to shut off the sides of the shaft and leave 6 blocks of space open up in the front, if you want to view the drowned falling. Drowned can drift while falling, so an open drop with no walls might prevent the drowned from falling onto the killing platform at the bottom.
The shaft doesn't have to exist alpine, but if you desire to kill the drowned with 1 hit from your sword, ideally the drowned should fall 21 blocks before landing on the hopper in your killing platform. Go far likewise tall, and the drowned die from the fall, and you don't get any experience or tridents or other drops. If y'all make the shaft shorter, you just have to hit the drowned more than times to kill them — up to iv hits with a stone sword, which is also required from the flooded dungeon subcontract described above. One striking with a stone sword is sufficient to kill a mob that fell 21 blocks.
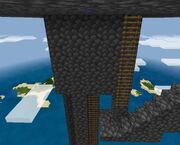
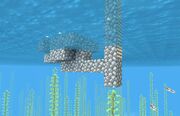
Exterior of iii×3 driblet platform, in which water sweeps drowned into the drop shaft where they fall down the desired distance.
- Drop platform (if using Bedrock Edition drinking glass roof)
This is needed merely if you are using the glass-roof darkness mechanic in Bedrock Edition.
This is a small room at the top of the drop shaft. The drowned fall into this room from the spawning platform higher up it. The purpose of this room is to create a measured distance for the drowned to fall, because the spawning platform is by necessity a lethal fall distance higher than the killing platform, and you don't want the drowned to die except by your own manus! And then you must build a small platform covered with flowing water for the drowned to fall into safely, and be swept by the water into a i×1 hole in the corner of the room, which is the top of your drop shaft.
One water source block diagonally across from the exit hole is sufficient. Identify a wooden push button or a sign on the wall but in a higher place the pigsty to keep the h2o from flowing into it.
Case of interior of a spawning platform with water sweeping into a center hole that empties into the drib platform.
- Spawning platform
The water in the spawning platform must be at to the lowest degree 24 blocks from the killing platform, considering mobs don't spawn nearer than 24 blocks from the actor. Make it as large as you want. it can be equally small every bit 2×2 but larger means more drowned. Flowing water is used to sweep mobs into a pigsty. A pocket-sized spawning room can sweep the mobs to a hole in the side or corner of the room. A large spawning room, say with at to the lowest degree a sixteen×16 surface, would have water sweeping the mobs into a pigsty in the center.
(If you make the heart pigsty 3×3, y'all can bladder a rock block higher up the pigsty with a turtle egg on it to attract the drowned to the hole, with trap doors around to make the drowned think at that place's a path to the egg. The turtle egg doesn't hatch when not on sand. However, getting a turtle egg requires a tool enchanted with Silk Affect, which may not be readily available to a histrion in survival way. The farm even so works without the turtle egg although the drowned are slower near falling through.)
Your spawning platform should be completely covered with flowing water to sweep the drowned into the drop platform room beneath. Ideally the water should just reach the edge of the hole, but if water flows into the hole, you can stop the flow with a sign or push button. Your drop room beneath the spawn chamber should be configured so that drowned are swept into the drop shaft.
- Spawning room
| ↑ | ||||||
| 18 | - | 30 | ||||
| ↓ | ||||||
| ↑ | ||||||
| 3 | – | 5 | ||||
| ↓ | ||||||
| ↑ | ||||||
| 21 | ||||||
| ↓ | ||||||
Cross-section of spawn room, with water sweeping mobs into a drop shaft to a killing platform.
The walls around the spawning platform should be alpine enough to provide sufficient darkness on the spawning flooring. In Boulder Edition, it should be eight or ix blocks tall to guarantee sufficient darkness on the floor later the transparent roof is in place. In Java Edition, you will need the wall to exist at to the lowest degree 9 blocks loftier to suit a layer of signs and several layers of h2o (17 layers of h2o guarantees total darkness on the spawn surface). Identify slabs on the top of the wall to prevent mobs from spawning on it.
One layer above the flowing water on the spawn platform floor, you need a layer of signs roofing the area, to hold up columns of water above.
On height of the signs, place 18 or more layers of h2o to brand the light level goose egg at the bottom. Drowned spawn in this water and drop through the signs onto the spawn platform. The deeper you make it, the more opportunities drowned take to spawn, especially in the daytime during which the top 17 layers of water are not night enough for spawning drowned.
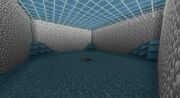
View of a spawn platform roof: a layer of glass blocks covered with h2o blocks.
- Alternative spawning room (Bedrock Edition only)
This alternative requires a layer of glass blocks and only one layer of water, instead of several layers of h2o. It works but in Bedrock Edition.
Make the ceiling completely from glass blocks, with at to the lowest degree half dozen blocks between the floor and lesser of the glass. ane cake of rock wall (excluding the slabs on the top edge of the wall) should extend above the height of the glass, to course a shallow puddle that yous must fill completely with h2o source blocks (no flowing h2o). You can build a temporary infinite water source off to the side to work with as you lot fill the pool.
Using a glass-bottomed pool for the ceiling takes advantage of the fact that drowned spawn under water but not on transparent surfaces, so they end up spawning on the platform under the glass. The water attenuates the heaven light by ii, and each block of space under the drinking glass causes further attenuation. 1 needs at thirteen blocks of space (including the glass) under the water for the light level to be goose egg on the platform to let drowned spawn during the daytime. Drowned also cannot spawn on bottom slabs, but using bottom slabs instead of glass for the bottom of the puddle makes the farm inoperable. The bottom of the pool must be glass.
Operation [ ]
Later the commencement 15 minutes of functioning, this subcontract already collected a trident, some gold (copper ingots in 1.17 and later on), and a nautilus shell (hard difficulty).
The subcontract becomes operational as before long as the glass-bottomed pool is filled and yous descend to the killing platform. Whack at the drowned legs with your sword (or your fist), and start collecting loot and experience. Fish also spawn in this farm and by and large swim upstream avoiding the fall, just once in a while they autumn through and die. This does non impact drowned spawning, but expect to see an occasional raw cod or salmon appear in your chest.
To increment the farm functioning, stand up on your killing platform and clear all the hostile mobs from the world by temporarily switching the game to peaceful difficulty and and so back. Then the only available location where mobs can spawn is your spawning platform. Switching the difficulty to "hard" yields ameliorate loot in the collection chest.
Improvements [ ]
The aerial farm described here is slow, although information technology does produce tridents and nautilus shells. This is the most basic farm, needing just basic materials that are readily available in survival way.
One reason for the wearisome yield is due to the mob cap. For case, In Bedrock Edition, but five naturally spawned drowned tin exist at any given time. The drowned try to resist the water flow in the spawn platform; therefore they spend much time facing upstream within the platform before eventually falling through the hole.
To speed things up, the drowned demand to face the hole. Ane fashion to exercise achieve this is to find a turtle egg. Unfortunately, once you lot find a turtle egg, retrieving information technology requires a pickaxe enchanted with Silk Touch, which may non exist available easily in survival. If you can get a turtle egg, your spawning platform should take a 3×3 hole in the center with a block suspended in the middle, continued to the edge of the hole by trapdoors in the open position so that drowned are fooled into thinking they can pathfind to the egg to trample on it. Instead, they fall through the trapdoors. The turtle egg doesn't hatch unless information technology's on sand. Drowned are non automatically attracted to turtle eggs; they must happen to look in the right direction offset, only once a drowned sees it and can find a path to it, the drowned goes for information technology and falls through the pigsty.
The all-time bait is a villager, but in a survival build, it is impractical to transport a villager high in the sky to the spawn platform. Too, if playing an island survival game with few resources, at that place may not be any villages available to poach. This gets into more exotic farms. The purpose of this tutorial is to teach the basics of drowned farming in survival way.
To bypass the mob cap and dramatically increase the product rate, you can have the drowned be swept into a Nether portal, so the drowned disappear from the Overworld and drop onto a killing platform in the Nether. This works fine if you are the but player in the world, but if there are other players in the Under, they demand to be inside the despawning radius of the killing platform to prevent the drowned from despawning in the Nether.
Complex variations [ ]
The basic flooded-dungeon drowned subcontract described in this tutorial is quick and simple to construct in survival way. It isn't automatic, nonetheless. It requires your involvement to harvest items from the drowned. While information technology doesn't yield tridents (and doesn't yield nautilus shells in Java Edition), that subcontract is nonetheless useful for a survival-fashion zombie loot farm to get feel, tools, armor, and weapons with occasional interesting enchantments, every bit well as other items — without needing to build a deep falling pit or a tall structure in the sky.
Drowned farms on the bounding main floor are more complicated because they function similarly to a mob farm, capturing naturally-spawned drowned. First, the drowned should be attracted to one location. In one case they are attracted, they need to be funneled into one surface area where the player tin can hands kill them. The attracting is frequently washed with villager bait and the funneling is frequently accomplished with chimera columns.
Fancier variations [ ]
Some farms incorporate innovative ideas such every bit bubble-column elevators to bring items to surface level, and devices to sort items. The player tin circumvent the hostile mob cap (but non the maxEntityCramming gamerule) past pushing the attracted drowned into the Nether dimension. If the Nether dimension is unusable for this purpose, so the bubble columns can transport the drowned upwardly to the player's AFK spot, typically loftier in the sky.
YouTube examples [ ]
Java Edition [ ]
A river biome converted to an aerial drowned farm (1.17 and lower):
A river biome converted to an aerial drowned subcontract that takes advantage of terrain generation changes (i.18+):
This river biome farm uses a flying machine to place over a 1000000 h2o blocks quickly. The depicted method of harvesting the drowned from this farm, however, is dangerous in survival as information technology involves pond afterwards trident-throwing drowned in a crowd of other drowned.
Basic underwater farm:
Advanced river subcontract (fastest design):
Boulder Edition [ ]

How To Attract Zombies In Minecraft,
Source: https://minecraft.fandom.com/wiki/Tutorials/Drowned_farming
Posted by: edwardsmajected1995.blogspot.com
0 Response to "How To Attract Zombies In Minecraft"
Post a Comment